Wednesday, November 20, 2024

Creative Birdhouse Projects to Stand Out at Markets

Beyond the Basic Birdhouse: Crafting Unique Designs for Market Success

Tired of seeing the same old birdhouses at every craft market? Want to create eye-catching designs that truly stand out and attract buyers? Then prepare to ditch the predictable and embrace creativity! This article provides a blueprint for crafting unique birdhouses that will not only charm customers but also boost your market sales. We'll explore innovative designs, materials, and finishing techniques to help you build a birdhouse empire.

Embrace Unexpected Materials

Forget plain wood. Think outside the box (or, perhaps, *inside* a repurposed box!). Using unconventional materials is a fantastic way to add personality and intrigue to your birdhouses. Consider incorporating recycled materials like vintage tin cans (carefully cleaned and sealed, of course!), repurposed pallets (ensure the wood is treated and safe for birds), or even upcycled teacups and saucers to create whimsical, miniature birdhouse cottages. A truly unique touch comes from integrating natural elements like driftwood, moss, or even colorful stones into the design. The possibilities are truly limitless, and customers will appreciate the sustainable and creative approach. Remember to always prioritize the safety and well-being of the birds by using non-toxic materials and finishes.

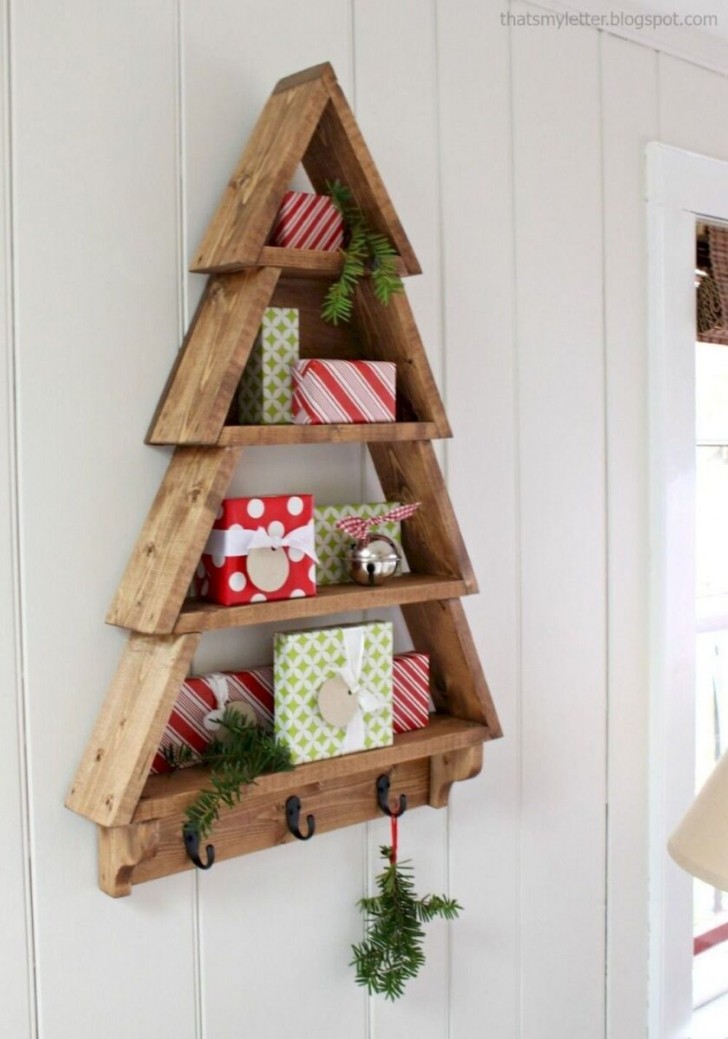
Unleash Your Inner Architect: Exploring Unique Shapes and Styles

Move beyond the classic A-frame. Experiment with different architectural styles and shapes! Imagine a charming Victorian-style birdhouse complete with tiny, intricately carved details, or a sleek, modern birdhouse constructed from geometric shapes and clean lines. You could even try creating a whimsical mushroom-shaped birdhouse, a miniature castle, or a quirky spaceship for the avian adventurers in your neighborhood. Consider the overall aesthetic of your market stall and create a cohesive collection that reflects your unique brand and artistic vision. Don't be afraid to experiment; the most memorable birdhouses often stem from unexpected inspirations.

Adding Intricate Details for Maximum Impact

Small details can make a huge difference. Once you have the basic structure down, elevate your birdhouses with carefully considered details. These could include:

  • Intricate carvings:
  • Hand-painted designs and patterns:
  • Miniature shingles or clapboard siding:
  • Small, decorative hardware like tiny hinges or latches:
  • Adding small, bird-friendly climbing features to the exterior.

Remember, the goal is to create a birdhouse that is both functional and visually stunning. Details should enhance the overall design, not overwhelm it.

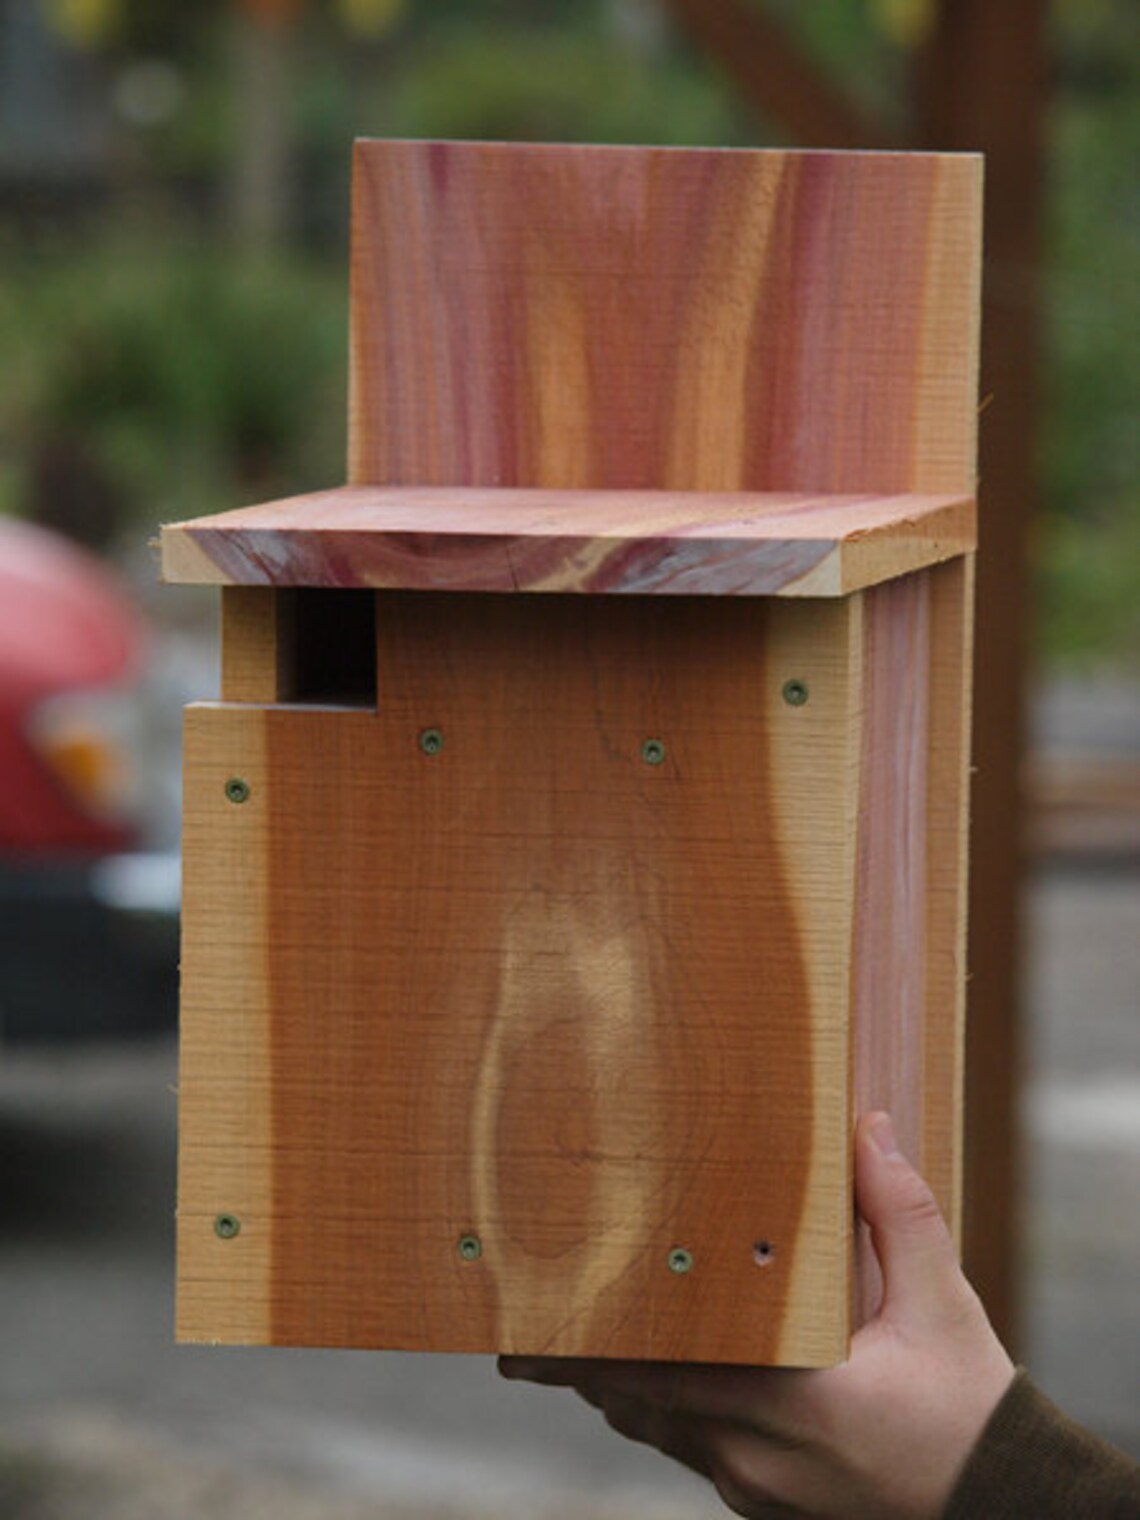
Beyond Aesthetics: Functionality First

While aesthetics are crucial, never compromise functionality. Your birdhouses need to be safe and comfortable for their feathered inhabitants. Ensure adequate ventilation, a weatherproof design, and a properly sized entrance hole appropriate for the intended bird species. Consider providing additional features, such as a perch or a small drainage system, to enhance the birdhouse's practicality and appeal to customers who are also bird enthusiasts. Research different bird species and their nesting preferences to tailor your designs effectively. By demonstrating a commitment to both beauty and bird-friendly design, you'll gain trust and credibility.

Marketing Your Masterpieces

Once you've crafted your unique birdhouses, it's time to market them effectively. High-quality photographs are essential. Showcase your birdhouses from various angles, highlighting the intricate details and unique features. Use engaging descriptions that emphasize the craftsmanship, the unique materials, and the benefits for both birds and buyers. Consider offering a variety of sizes and styles to cater to different customer preferences. And don't forget to offer personalized touches â€" perhaps a small, hand-written note with each purchase â€" to create a memorable customer experience. Remember, creating exceptional birdhouses is only half the battle; effectively marketing them is equally crucial for market success.

Easy Pallet Wine Rack Ideas to Try

Easy Pallet Wine Rack Ideas to Try

Easy Pallet Wine Rack Ideas to Try

Wine enthusiasts know that a well-stocked wine cellar is a treasure. But what if you don't have the space or the budget for a traditional wine rack? Fear not, for the humble pallet offers a surprisingly versatile and affordable solution. With a little creativity and elbow grease, you can transform a simple pallet into a stunning and functional wine rack that adds rustic charm to your home.

Why Choose Pallet Wine Racks?

Pallet wine racks offer numerous advantages over traditional options:

  • Affordability: Palets are often available for free or at a very low cost. You can often find them at local businesses, construction sites, or online marketplaces.
  • Sustainability: Repurposing pallets reduces waste and promotes eco-friendly practices.
  • Versatility: Pallets come in various sizes and shapes, allowing for customizable wine rack designs to fit your space and style.
  • Rustic Charm: The natural wood texture and weathered appearance of pallets adds a unique and charming element to your décor.

Easy Pallet Wine Rack Projects

Here are some easy and inspiring pallet wine rack ideas to get you started:

Simple Horizontal Wine Rack

This project is perfect for beginners and requires minimal tools and effort.

  1. Select a sturdy pallet: Choose a pallet with strong slats and no signs of damage.
  2. Clean and sand the pallet: Remove any dirt, debris, or loose nails. Sand the surface to create a smooth finish.
  3. Stain or paint (optional): Enhance the look of the pallet by applying a stain or paint of your choice.
  4. Create bottle slots: Measure the width of your wine bottles and mark the pallet slats accordingly. Use a saw to cut out slots for each bottle.
  5. Mount or stand the rack: You can mount the rack on the wall or simply stand it against a wall.

Vertical Wine Rack

A vertical wine rack is a space-saving option that utilizes wall space effectively.

  1. Prepare the pallet: Clean, sand, and stain or paint the pallet as described above.
  2. Install vertical slats: Cut additional wooden slats to create vertical compartments for the bottles. Secure these slats to the pallet using screws or nails.
  3. Create bottle dividers: Add horizontal slats to create dividers between each bottle. These dividers will help to keep the bottles upright and secure.
  4. Mount the rack: Attach the vertical wine rack to the wall using appropriate hardware.

Pallet Wine Rack with Shelves

This project adds a touch of sophistication to your wine storage.

  1. Build the base: Use two or three pallet slats to create a stable base for your shelves.
  2. Construct the shelves: Cut additional pallet slats to create the desired shelf length. Secure these shelves to the base using screws or nails.
  3. Add bottle slots: Cut bottle slots into the shelves to hold the wine bottles.
  4. Finish the rack: Stain or paint the rack as desired and let it dry completely.

Pallet Wine Rack with Storage

Combine wine storage with additional storage space for glassware or accessories.

  1. Design the layout: Divide the pallet into sections for wine bottles and storage. You can use existing slats or add additional ones to create compartments.
  2. Build the wine bottle section: Cut bottle slots into the designated area of the pallet.
  3. Construct the storage compartments: Add shelves or drawers for glassware, corkscrews, or other wine accessories.
  4. Decorate and personalize: Paint the pallet, add decorative accents, or attach a label to the front of your wine rack.

Tips for Success

Follow these tips for creating a beautiful and functional pallet wine rack:

  • Choose the right pallet: Opt for a sturdy pallet that is free of damage and has strong slats.
  • Measure carefully: Take accurate measurements of your wine bottles to ensure the slots are the correct size.
  • Use proper tools: Invest in quality tools such as a saw, drill, and screws for a professional-looking finish.
  • Safety first: Always wear safety goggles and gloves while working with power tools.
  • Let your creativity flow: Don't be afraid to experiment with different designs and personalize your pallet wine rack to match your style.

Conclusion

Creating a pallet wine rack is a fun and rewarding project that combines practicality with rustic charm. With a little effort and imagination, you can turn a discarded pallet into a stunning piece of furniture that will enhance your home décor and impress your guests. So grab a pallet, gather your tools, and let your creativity flow!

Beginner-Friendly Birdhouses to Make and Sell

Beginner-Friendly Birdhouses to Make and Sell

Beginner-Friendly Birdhouses to Make and Sell

Birdhouses are not only a charming addition to any backyard, but they also offer a valuable service to our feathered friends. As a beginner woodworker, creating and selling birdhouses can be a rewarding and profitable venture. This guide will explore several easy-to-make birdhouse designs, providing step-by-step instructions and valuable tips to enhance your success.

Choosing the Right Birdhouse Design

The first step in your birdhouse journey is selecting a design that aligns with your skills and target market. Some popular and beginner-friendly options include:

Classic A-Frame Birdhouse

This timeless design is straightforward to build and readily accepted by various bird species. Its sloping roof and simple construction make it an excellent choice for novice woodworkers.

Squirrel-Proof Birdhouse

For those seeking a more challenging project, a squirrel-proof birdhouse requires additional features to deter these persistent critters. This design often includes a baffle or a metal shield around the entrance hole to prevent squirrels from accessing the nesting cavity.

Bluebird House

Bluebirds prefer a specific type of nesting box with a smaller entrance hole and a placement on a post or platform. This design caters to the unique needs of these delightful birds.

Essential Materials and Tools

To embark on your birdhouse creation, you'll need a few essential materials and tools:

Materials:

  • Wood: Cedar, pine, or redwood are popular choices due to their durability and natural resistance to decay.
  • Screws: Use galvanized or stainless steel screws to ensure longevity.
  • Paint: Choose a non-toxic, weather-resistant paint for the exterior.
  • Roofing shingles: Protect the roof from the elements.
  • Entrance hole drill bit: The size of the hole depends on the intended bird species.
  • Birdhouse hardware: Includes a mounting bracket, cleaning door, and ventilation holes.

Tools:

  • Saw: A circular saw or handsaw for cutting wood.
  • Drill: A cordless drill with a variety of drill bits.
  • Screwdriver: A Phillips-head screwdriver is essential for assembling the birdhouse.
  • Measuring tape: For precise cutting and marking.
  • Level: To ensure the birdhouse is properly aligned.
  • Sandpaper: For smoothing rough edges and creating a polished finish.
  • Paintbrush: For applying paint to the exterior.

Step-by-Step Instructions: Building a Classic A-Frame Birdhouse

Let's delve into the step-by-step process of constructing a classic A-frame birdhouse:

  1. **Cut the Wood:** Begin by cutting the wood to the desired dimensions for the base, sides, roof, and back. Refer to a birdhouse design plan or your own measurements.
  2. **Assemble the Base:** Attach the base pieces together, creating a square or rectangular frame. Use screws to secure the joints.
  3. **Attach the Sides:** Connect the side pieces to the base, ensuring they are flush with the top of the base.
  4. **Create the Roof:** Cut the roof pieces into a triangular shape, then attach them to the sides. Secure the roof pieces with screws.
  5. **Add the Back:** Attach the back piece to the sides, completing the enclosure.
  6. **Cut the Entrance Hole:** Drill the entrance hole on one of the sides, using a drill bit that is appropriate for the intended bird species.
  7. **Install the Birdhouse Hardware:** Add the mounting bracket, cleaning door, and ventilation holes as needed.
  8. **Sand and Paint:** Sand the birdhouse thoroughly to smooth any rough edges. Apply a coat of weather-resistant paint to the exterior.
  9. **Apply Roofing Shingles:** Secure the roofing shingles to the roof to protect it from the elements.

Essential Tips for Beginner Birdhouse Builders

As you embark on your birdhouse journey, keep these essential tips in mind:

Consider the Bird Species

Research the nesting preferences of the bird species you wish to attract. Different birds prefer specific sizes, entrance hole dimensions, and placement.

Use Durable Materials

Opt for weather-resistant woods like cedar, pine, or redwood to ensure your birdhouse withstands the elements.

Pay Attention to Detail

Precision is key in birdhouse construction. Accurately measure and cut the wood to ensure the birdhouse is structurally sound and aesthetically pleasing.

Safety First

Always prioritize safety when working with power tools. Wear appropriate safety gear, including eye protection and gloves.

Promote Sales

To attract customers, showcase your birdhouses at local craft fairs, farmers markets, and online marketplaces. High-quality photos and detailed descriptions will capture the attention of potential buyers.

Conclusion

Creating and selling birdhouses can be an enjoyable and lucrative venture. By choosing beginner-friendly designs, using durable materials, and following these essential tips, you can build high-quality birdhouses that attract birds and delight customers.

Monday, November 18, 2024

How to Build Wooden Key Holders with a Sleek, Contemporary Look

How to Build Wooden Key Holders with a Sleek, Contemporary Look

Elevate Your Entryway with Sleek, Contemporary Wooden Key Holders

A well-designed key holder is more than just a practical necessity â€" it's a statement piece that sets the tone for your home. Tired of the bulky, generic options available? Embrace the beauty of natural wood and create your own sleek, contemporary key holder that reflects your style and complements your decor. This guide will walk you through the process, from design inspiration to finishing touches, empowering you to build a truly unique and functional piece for your entryway.

Design Inspiration: Finding Your Key Holder's Identity

Before you reach for the tools, let your creativity flow! Explore different design ideas and consider your personal style and the aesthetic of your home.

Shape and Form

Will it be a classic rectangular shape, a modern geometric design, or something completely unique? Consider the space you have and how the shape will interact with the surrounding decor. A sleek, minimalist design will complement modern spaces, while a more organic, curved form might be perfect for a rustic or farmhouse setting.

Wood Selection

The wood you choose plays a significant role in the final look and feel of your key holder. Walnut, cherry, and maple offer rich, warm tones, while ash and oak provide a more contemporary, slightly cooler aesthetic. Consider the grain patterns, hardness, and natural variations in color when making your decision.

Functionality

Think about how you want to use the key holder. Will you hang keys on hooks, attach them with magnets, or use a combination of both? Consider the number of keys you need to store and plan the layout accordingly.

Essential Tools and Materials

Gather the necessary tools and materials to ensure a smooth and successful build:

  • Wood: Choose your preferred species and thickness (1/2 inch to 3/4 inch is common).
  • Wood glue: A strong, durable glue for assembling the key holder.
  • Clamps: Securely hold pieces together during assembly.
  • Saw: A table saw or circular saw for precise cuts.
  • Sandpaper: Various grits for smoothing surfaces and edges.
  • Wood finish: Oil, wax, or polyurethane to protect and enhance the wood's natural beauty.
  • Screws or nails: For attaching hooks, magnets, or other hardware.
  • Hooks or magnets: Depending on your chosen key storage method.
  • Measuring tape, pencil, ruler: For accurate measurements and marking.
  • Safety goggles and dust mask: Protect your eyes and lungs from dust and debris.

Building the Key Holder: Step-by-Step

Now, let's bring your design to life!

1. Cut the Pieces

Using your saw, carefully cut the wood according to your design specifications. Ensure precise cuts for a clean, professional look.

2. Sand the Surfaces

Sand all surfaces of the wood with progressively finer grits of sandpaper, starting with a coarser grit to remove rough edges and gradually refining the surface to a smooth finish.

3. Assemble the Key Holder

Carefully join the cut pieces of wood using wood glue. Clamp them securely together, ensuring all surfaces are aligned properly. Allow the glue to dry completely as recommended by the manufacturer.

4. Add Hooks or Magnets

Mark and pre-drill holes for attaching hooks, magnets, or other hardware. Screw or nail them into place, making sure they are secure and evenly spaced.

5. Apply the Finish

Once the glue has dried and all hardware is in place, apply your chosen wood finish. Sand lightly between coats for a smooth, even finish.

Finishing Touches: Enhancing the Look

A little extra effort goes a long way in creating a truly unique and eye-catching key holder.

Personalized Engraving

Add a personal touch by engraving your initials, a family name, or a meaningful quote onto the wood. This subtle detail elevates the key holder from functional to sentimental.

Creative Hardware

Don't limit yourself to standard hooks. Explore decorative hooks with unique shapes, colors, or finishes. For a modern look, consider using magnetic strips or custom-cut metal pieces.

Accessorize with Style

Enhance the overall look by incorporating a small, decorative element like a natural branch, a piece of driftwood, or a metal accent. Let your creativity guide you!

Enjoy Your Sleek, Contemporary Key Holder

With a little patience and a dash of creative flair, you've crafted a functional and stylish key holder that's sure to impress. It's not just a place to hang your keys, it's a statement piece that adds a touch of warmth and personality to your entryway.

Wednesday, November 13, 2024

How to Make Beautiful Wood Serving Trays with Handles

How to Make Beautiful Wood Serving Trays with Handles

Craft a Show-Stopping Serving Tray with Handles: A Step-by-Step Guide

Calling all DIY enthusiasts and home decor lovers! Are you ready to elevate your entertaining game and create a truly unique statement piece for your home? Look no further than crafting a beautiful wood serving tray with handles. It's a project that's surprisingly manageable, even for beginners, and the results are incredibly rewarding. Imagine serving up a spread of delectable treats on a tray that you handcrafted yourself, a piece that exudes warmth and charm. Sounds pretty amazing, right?

This guide will walk you through every step, from choosing the perfect wood to finishing touches, so you can build a serving tray that reflects your personal style. So, grab your tools, gather your materials, and let's get crafting!

Choosing the Right Wood for Your Serving Tray

The wood you choose is the foundation of your tray, so selecting the right one is key. Consider the look and feel you're aiming for:

Types of Wood for Serving Trays

  • Hardwoods: For a classic and durable tray, hardwoods like oak, maple, or walnut are excellent choices. They're strong, resist scratches, and have beautiful natural grain patterns.
  • Softwoods: Pine, cedar, and fir offer a more affordable option with a rustic charm. They're easier to work with but might require more care to avoid scratches.
  • Exotic Woods: For a truly unique touch, consider exotic woods like cherry, mahogany, or teak. They boast striking grain patterns and rich colors, adding an extra layer of sophistication.

Considerations When Selecting Wood

  • Grain Pattern: The wood's grain pattern can dramatically affect the final look. Choose a pattern that complements your overall design aesthetic.
  • Color: Consider the color of the wood you choose and how it will blend with your existing décor.
  • Thickness: The thickness of the wood impacts the tray's sturdiness and overall weight. Aim for a thickness that provides stability without being overly heavy.
  • Availability: Check the availability of your chosen wood type in your local area. It might be easier to source certain woods than others.

Gathering the Necessary Tools and Materials

Before diving into the project, make sure you have all the essential tools and materials ready:

Tools

  • Measuring Tape: For accurate measurements of the tray dimensions.
  • Pencil: To mark the wood for cutting and drilling.
  • Circular Saw or Jigsaw: For cutting the wood to size.
  • Sandpaper (various grits): To smooth out the wood surface.
  • Drill: For drilling holes for the handles.
  • Screwdriver or Drill Bits: For attaching the handles to the tray.
  • Clamps: To hold the pieces together while gluing.
  • Wood Glue: For adhering the tray sides and handles.

Materials

  • Wood (in your chosen size and type): Enough to create the tray base and sides.
  • Handles (wood or metal): Choose handles that match your style and the size of the tray.
  • Wood Stain or Paint (optional): For customizing the tray's color and finish.
  • Wood Finish (polyurethane or varnish): To protect the wood and enhance its durability.

Building Your Serving Tray Step-by-Step

Now for the fun part, let's build your serving tray! Follow these steps to bring your vision to life:

Step 1: Measuring and Cutting the Wood

Start by measuring the desired size of your tray. Consider how large you want it to be for serving your needs. It's best to have a rough idea of the dimensions before you head to the lumberyard to pick out your wood.

Once you have your measurements, carefully mark the wood for cutting. Using a circular saw or jigsaw, cut the wood to size. For a more polished look, make sure to cut the edges with a straight edge, allowing for a smooth and even finish.

Step 2: Sanding the Wood

Sanding the wood is crucial to create a smooth surface that's ready for finishing. Start with coarse-grit sandpaper and work your way down to finer grits. Sand all sides of the wood, including the edges, for a smooth and consistent feel. Be sure to sand in the direction of the wood grain for the best results.

Step 3: Assembling the Tray

This step involves bringing your tray together. Align the tray sides with the base, ensuring they are perfectly flush. Apply a generous amount of wood glue along the edges where the sides and base meet. Use clamps to hold the pieces together while the glue dries. Let the glue set completely before removing the clamps.

Step 4: Drilling for Handles

With your tray assembled, you can now drill holes for the handles. Measure and mark the locations for the handles on the tray sides. Drill pilot holes, slightly smaller than the screw size, to prevent the wood from splitting. Use a drill bit that matches the size of your screws or the chosen method of handle attachment.

Step 5: Attaching the Handles

Now you are ready to attach the handles. Attach the handles to the tray sides using screws, wood glue, or a combination of both, ensuring they are securely fastened. You may need to pre-drill pilot holes in the handles to ensure they attach smoothly.

Step 6: Finishing the Tray

Now it's time to bring out the character of your serving tray. You can stain or paint the wood to enhance its natural beauty or create a more personalized touch. Choose a stain or paint color that complements your décor and personal style. Apply the stain or paint in a thin, even coat. Allow the stain to dry completely before applying a protective topcoat.

Finally, apply a protective finish, such as polyurethane or varnish, to seal the wood and enhance its durability. This layer will protect your tray from scratches, spills, and everyday wear and tear. Apply the finish in thin coats, allowing each coat to dry completely before applying the next. You may want to apply a few coats for a more robust finish.

Personalizing Your Serving Tray

Now that you have a beautiful serving tray, let's add a personal touch. You can customize your serving tray to reflect your unique style. Here are some ideas:

Decorative Elements

  • Engraving: Add a personalized touch with a simple engraved design on the tray surface.
  • Decoupage: Embellish the tray with decoupage techniques, using your favorite images or paper designs.
  • Inlays: Incorporate decorative inlays using contrasting wood species to create intricate patterns.
  • Mosaic Tiles: Use mosaic tiles to add a touch of artistic flair to the tray surface.

Unique Handle Choices

  • Leather Straps: Choose leather straps for a rustic, vintage feel.
  • Metal Handles: Metal handles in brass, copper, or iron offer a contemporary touch.
  • Rope Handles: Add a nautical vibe with rope handles.

Enjoy Your Handcrafted Serving Tray

Congratulations! You've crafted a beautiful and unique serving tray. You can now proudly present your culinary creations with a touch of handmade charm. It will be a treasured piece in your home and a conversation starter at your gatherings.

So go ahead, enjoy your handiwork, and savor the satisfaction of having created a piece that's both functional and aesthetically pleasing. And remember, the possibilities are endless! Experiment with different wood types, finishes, and decorative elements to create a serving tray that truly reflects your personal style.

Practical Woodworking Gifts: Useful and Functional Presents

Practical Woodworking Gifts: Useful and Functional Presents

Practical Woodworking Gifts: Useful and Functional Presents

In a world increasingly driven by digital distractions, there’s something deeply satisfying about a well-crafted, handmade gift. Woodworking projects offer a unique opportunity to create personalized, practical presents that demonstrate thoughtfulness and skill. Whether you’re looking for a gift for a seasoned woodworker or a friend just starting out, these useful and functional woodworking ideas are sure to be appreciated.

For the Kitchen Connoisseur

The kitchen is a hub of activity, making it the perfect place to showcase practical woodworking gifts. Consider these ideas for your culinary-minded friends:

Cutting Boards

A handcrafted cutting board is a timeless and essential kitchen tool. Choose from a variety of wood species, including maple, cherry, or walnut, each with its unique grain pattern and durability. Add personalized touches like engraved initials, a unique shape, or even a built-in juice groove.

Spice Racks

Keep spices organized and within reach with a stylish spice rack. Opt for a freestanding model or a wall-mounted design to maximize space. Add a touch of rustic charm with a distressed finish or embrace a minimalist aesthetic with a clean, sleek design.

Utensil Holders

Organize cooking essentials with a custom-made utensil holder. Design a simple, cylindrical container or explore a more intricate design with multiple compartments for different utensils. Enhance the functionality with a built-in handle for easy transport.

For the Homebody

Create a cozy and inviting atmosphere with woodworking gifts designed for the home. Explore these ideas for the homebody in your life:

Wall Shelves

Enhance any room with custom-made wall shelves. Choose from sleek floating shelves for a minimalist aesthetic or opt for rustic brackets for a more traditional look. Personalize the shelves with decorative elements like woodturning or metal accents.

Magazine Racks

Keep reading material organized and easily accessible with a handcrafted magazine rack. Explore a variety of designs, from simple, rectangular shapes to more intricate, multi-tiered models. Consider adding a built-in handle for easy transport.

Picture Frames

Showcase cherished memories with personalized picture frames. Choose from a variety of wood species and finishes to complement existing decor. Add a unique touch with decorative elements like woodburning, inlays, or hand-painted designs.

For the Outdoor Enthusiast

Elevate outdoor experiences with woodworking gifts designed for nature lovers. Consider these ideas for the outdoor enthusiast:

Birdhouses

Attract feathered friends with a handcrafted birdhouse. Choose from a variety of designs, from simple, classic styles to whimsical, intricate models. Utilize durable wood species like cedar or redwood for long-lasting protection.

Planters

Add a touch of greenery to any outdoor space with personalized planters. Choose from a variety of wood species and finishes to complement existing landscaping. Create unique shapes and sizes to fit various plants and flowers.

Outdoor Furniture

Create a comfortable and stylish outdoor oasis with custom-made furniture. From simple benches and chairs to more intricate picnic tables and swings, woodworking offers endless possibilities for outdoor relaxation. Utilize weather-resistant wood species like teak or cedar for durability.

Beyond the Ordinary: Personalized Touches

Elevate any woodworking gift with personalized touches that demonstrate extra effort and thoughtfulness. Consider these ideas:

  • Engraved Names or Initials: Add a personal touch to cutting boards, spice racks, or picture frames with engraved names or initials.
  • Custom Shapes and Sizes: Design unique shapes and sizes for cutting boards, planters, or birdhouses to truly make the gift stand out.
  • Hand-Painted Designs: Add a decorative element with hand-painted designs on picture frames, birdhouses, or other woodworking projects.
  • Custom Finishes: Choose from a variety of wood finishes to complement existing decor or create a unique, personalized look.
  • By embracing the beauty of handmade creations, you can offer practical woodworking gifts that go beyond the ordinary. These gifts are sure to be cherished for years to come, symbolizing both skill and thoughtfulness.

    DIY Wood Floating Shelves: A Step-by-Step Guide

    DIY Wood Floating Shelves: A Step-by-Step Guide

    DIY Wood Floating Shelves: A Comprehensive Guide

    Floating shelves are a stylish and practical addition to any room, offering a clutter-free way to display your belongings or showcase your decor. Crafting your own wooden floating shelves is a rewarding project that allows you to personalize your space and save money compared to purchasing pre-made options. This comprehensive guide will walk you through the process step-by-step, enabling you to create beautiful and functional floating shelves for your home.

    Materials and Tools

    Before embarking on your DIY project, gather the necessary materials and tools:

    Materials:

    • Wood boards: Choose a suitable wood type for your shelves, such as pine, maple, or oak. Consider the desired thickness and width for your shelves, taking into account the weight of the items you'll be displaying.
    • Brackets: Floating shelf brackets come in various styles, materials, and sizes. Select brackets that complement your shelves and the weight capacity required.
    • Wood stain or paint: Select a finish that complements your decor and protects the wood. Choose a stain if you want to enhance the natural wood grain, or paint if you prefer a solid color.
    • Wood filler: Use wood filler to patch any knots or imperfections in the wood.
    • Sandpaper: You'll need sandpaper in various grits for smoothing the wood and preparing it for staining or painting.
    • Polyurethane sealant (optional): Apply a sealant to protect the finish and enhance durability.
    • Screws: Choose screws that are appropriate for your wood and brackets. Make sure the screws are long enough to securely fasten the brackets to the wall.
    • Level: Essential for ensuring your shelves are perfectly horizontal.
    • Measuring tape: Used for precise measurements during the installation process.
    • Pencil: For marking the placement of the shelves and brackets.
    • Drill: Used to pre-drill holes for screws to prevent wood splitting.
    • Impact driver or screwdriver: For fastening screws.
    • Safety glasses: Protect your eyes during the cutting and drilling process.
    • Dust mask: Wear a dust mask to prevent inhaling sawdust.

    Step-by-Step Instructions

    1. Planning and Preparation

    Start by planning the layout of your shelves and determining the number and dimensions you'll need. Consider the placement of the shelves and the weight capacity of the brackets. Measure the wall space carefully and transfer these measurements to your wood boards for accurate cutting.

    2. Cutting the Wood

    Cut the wood boards to the desired length using a miter saw, circular saw, or handsaw. Ensure clean, straight cuts for a professional finish. If you're working with a long board, use sawhorses for support during the cutting process.

    3. Sanding the Wood

    Sand the edges of the wood boards to remove any sharp edges and smooth the surface for a comfortable finish. Use a coarse-grit sandpaper initially to smooth out any imperfections, followed by finer-grit sandpaper for a final polish. Sand along the grain for a uniform look.

    4. Filling Imperfections

    If your wood boards have any knots or imperfections, use wood filler to create a smooth surface. Apply the filler with a putty knife, let it dry according to the manufacturer's instructions, and then sand it down smooth.

    5. Staining or Painting

    Apply a wood stain or paint to your shelves according to the manufacturer's instructions. Use a brush or roller for a consistent application. Ensure a smooth, even coat and allow the stain or paint to dry completely before proceeding.

    6. Applying a Sealant (Optional)

    For added durability and protection, apply a polyurethane sealant to your shelves. Use a brush or roller to apply a thin, even coat and allow it to dry thoroughly before installing the brackets.

    7. Installing the Brackets

    Locate the desired placement for your shelves and mark the wall using a pencil. Hold the brackets in place and ensure they are level using a level. Mark the screw holes on the wall using a pencil. Pre-drill pilot holes to prevent the wood from splitting when screwing in the brackets.

    8. Securing the Brackets

    Secure the brackets to the wall using screws. Drive the screws in at an angle to create a more secure hold. Ensure the brackets are securely fastened before proceeding.

    9. Installing the Shelves

    Slide the shelves onto the brackets, ensuring they are perfectly level. Adjust the shelf placement as needed until you're satisfied with the alignment. The weight capacity of the shelves will depend on the brackets used. Avoid overloading the shelves, as this could cause them to sag or detach.

    10. Enjoy Your New Floating Shelves!

    Once your shelves are securely installed, you can personalize them with your favorite decorative items, books, or plants. Enjoy the beauty and functionality of your custom-built floating shelves.

    Tips and Considerations

    • Wood Selection: When choosing your wood, consider the style and weight capacity of the shelves. Pine is a budget-friendly option, while hardwoods like maple and oak are stronger and more resistant to scratches.
    • Bracket Selection: Brackets come in various styles, such as metal, wood, or plastic. Select brackets that complement the style of your shelves and provide adequate weight support.
    • Safety Precautions: Always wear safety glasses and a dust mask when cutting or sanding wood. Use caution when using power tools and follow manufacturer guidelines for safety.
    • Weight Capacity: Consider the weight of the items you'll be displaying on your shelves. Select brackets with a weight capacity that meets your needs. Overloading shelves can cause them to sag or detach.
    • Wall Material: Ensure your wall material can support the weight of the shelves. Use appropriate fasteners for your wall type. If you are unsure, consult with a professional for guidance.
    • Personalization: You can personalize your shelves further by adding decorative elements, such as paint, stencils, or wood burning.

    By following this step-by-step guide, you can create beautiful and functional floating shelves that enhance the style of any room in your home. Enjoy the satisfaction of building your own shelves and the creative freedom to customize them to your unique taste.

    Build These Easy Wood Projects with Minimal Tools

    Build These Easy Wood Projects with Minimal Tools

    Build These Easy Wood Projects with Minimal Tools

    Hey there, crafty friends! Are you itching to get your hands on some wood and create something awesome? Well, you don't need a fancy workshop or a million tools to start. With just a few basic supplies, you can tackle some fantastic woodworking projects that'll impress your friends and family.

    Let's be real, we all have those moments where we want to make something cool but then get intimidated by all the tools and instructions. But trust me, it's not as complicated as it seems! These projects are designed for beginners, with easy-to-follow steps and minimal tool requirements. So grab your hammer, saw, and a little bit of enthusiasm, and let's get crafting!

    Project 1: The Rustic Wooden Coasters

    First up, we're making some stylish and practical coasters to protect your furniture from those pesky condensation rings. You can get creative with the design, but for this project, we're going for a rustic look.

    What You'll Need:

    • Scrap wood (1/2-inch thick, approximately 4-inch squares)
    • Wood glue
    • Sandpaper (medium and fine grit)
    • Wood stain (optional)
    • Polyurethane sealant (optional)
    • Saw (hand saw or jigsaw)
    • Measuring tape
    • Pencil
    • Clamps (optional)

    Instructions:

    1. Measure and Cut: Use your measuring tape and pencil to mark out 4-inch squares on your scrap wood. Carefully cut these squares using your saw. Be sure to wear safety glasses!
    2. Sanding: Sand the edges and faces of your coaster squares with medium-grit sandpaper. Then, use fine-grit sandpaper to smooth out any rough spots. This will give your coasters a nice finish.
    3. (Optional) Stain: If you want to add some color, apply wood stain to the coasters according to the manufacturer's instructions. Let it dry completely before moving on.
    4. (Optional) Sealant: To protect your coasters and make them easier to clean, apply a coat of polyurethane sealant. Let it dry thoroughly.
    5. Done! You've now got a set of rustic coasters that'll make your coffee table look a million bucks.

    See? Easy peasy! Now, let's move on to another project that's sure to be a hit.

    Project 2: The Nifty Wooden Storage Box

    Tired of clutter? We've got you covered! This project is a great way to organize your small items and add a touch of rustic charm to your home decor.

    What You'll Need:

    • Wood planks (1/2-inch thick, approximately 8 inches wide and 12 inches long)
    • Wood glue
    • Finishing nails or brads
    • Sandpaper (medium and fine grit)
    • Wood stain (optional)
    • Polyurethane sealant (optional)
    • Saw (hand saw or jigsaw)
    • Measuring tape
    • Pencil
    • Hammer
    • Clamps (optional)

    Instructions:

    1. Cut the Pieces: You'll need two pieces of wood for the sides, two pieces for the ends, and one piece for the bottom. Measure and cut your planks to the desired size. For a box measuring about 8 inches wide, 12 inches long, and 4 inches tall, cut the sides and ends to be 4 inches long and the bottom to be 8 inches wide and 12 inches long.
    2. Assemble the Box: Apply wood glue to the edges of the two side pieces and then join them to the two end pieces, forming a box-like structure. Use clamps to hold the pieces together while the glue dries.
    3. Attach the Bottom: Once the glue is dry, apply wood glue to the edges of the bottom piece and carefully attach it to the inside of the box. Make sure it's flush with the edges.
    4. Nail it Down: For extra strength, use finishing nails or brads to secure the pieces together. Hammer them in gently, being careful not to split the wood.
    5. Sand and Finish: Once the nails are in place, sand the entire box with medium-grit sandpaper and then fine-grit sandpaper. This will create a smooth surface for your stain and sealant (if using).
    6. (Optional) Stain and Seal: If you want to give your box a nice color, apply wood stain according to the manufacturer's instructions. After the stain dries, apply a coat of polyurethane sealant for extra protection.
    7. Enjoy! Your beautiful wooden storage box is ready to tidy up your space.

    Pretty cool, right? You're already a woodworking whiz! Now, let's try something a little more decorative.

    Project 3: The Charming Wooden Wall Hanging

    This project is a great way to add some personality and warmth to your walls. And the best part? It's super simple and requires minimal tools.

    What You'll Need:

    • Scrap wood (approximately 12 inches long and 4 inches wide)
    • Wooden dowel (approximately 12 inches long)
    • Twine or rope
    • Hot glue gun and glue sticks
    • Sandpaper (medium and fine grit)
    • Wood stain or paint (optional)
    • Decorative elements (buttons, beads, fabric scraps, etc.)
    • Saw (hand saw or jigsaw)
    • Measuring tape
    • Pencil

    Instructions:

    1. Prepare the Wood: Cut your scrap wood to your desired length (about 12 inches) and width (about 4 inches). Sand the edges and face with medium-grit sandpaper and then fine-grit sandpaper to create a smooth finish.
    2. (Optional) Stain or Paint: If you want to add color, apply wood stain or paint to your wood piece. Let it dry completely.
    3. Attach the Dowel: Measure and mark the center of the top edge of your wood piece. Using your hot glue gun, attach the dowel to the marked center of the wood. Secure the dowel by applying glue along its entire length.
    4. Add Decorations: This is where you get to unleash your creativity! Using your hot glue gun, attach buttons, beads, fabric scraps, or any other decorative elements you like to the wood piece. Arrange them however you please to create a unique design.
    5. Create a Hanger: Tie a length of twine or rope to each end of the dowel. You can adjust the length of the twine to create a desired hanging height.
    6. Hang and Enjoy! Find a nice spot on your wall and hang your charming wooden wall hanging. It's a beautiful way to personalize your space.

    Isn't that cool? You've just made a one-of-a-kind decorative piece! It's amazing what you can accomplish with a few basic tools and a little imagination.

    These are just a few ideas to get you started on your woodworking journey. Remember, the possibilities are endless! You can find countless DIY projects online, in books, and at your local craft store. The key is to have fun, experiment, and don't be afraid to make mistakes. After all, that's how you learn!

    So, what are you waiting for? Grab your tools, get creative, and let's build something awesome together!

    Tuesday, November 12, 2024

    Simple Coffee Table Build: DIY Guide + Free PDF

    Simple Coffee Table Build: DIY Guide + Free PDF

    Simple Coffee Table Build: DIY Guide + Free PDF

    Are you looking to add a touch of personal style to your living room? Building your own coffee table is a rewarding project that allows you to create a unique piece of furniture that reflects your taste. This comprehensive guide will walk you through the process, from choosing the right materials to assembling your masterpiece.

    Choosing the Right Materials

    The first step is to select the materials that best suit your vision and skill level. For a simple coffee table, you can choose from various options, such as:

    • Wood: Pine, oak, or maple are popular choices for their affordability and workability.
    • Plywood: A cost-effective alternative to solid wood, plywood is strong and stable.
    • Reclaimed Wood: Gives your table a rustic charm and adds a unique touch.

    You’ll also need hardware like:

    • Screws: Choose screws that are appropriate for the wood you're using.
    • Wood Glue: Ensures a strong and durable bond between the table components.
    • Finishing Supplies: Sandpaper, stain, paint, or varnish to protect and enhance the appearance of your table.

    Step-by-Step Construction Guide

    1. Cut the Table Top

    Using a saw, cut your chosen wood to the desired size for the table top. Measure carefully and ensure that the edges are straight and square.

    2. Cut the Legs

    Cut the legs to the desired height, ensuring they are all the same length. If you want a more modern look, you can use straight legs. For a rustic style, consider using slightly tapered legs.

    3. Assemble the Table Top

    If you're using multiple pieces of wood for the table top, join them together using wood glue and screws. Clamp the pieces securely until the glue dries.

    4. Attach the Legs

    Place the legs at each corner of the table top. Pre-drill pilot holes for screws to prevent splitting the wood. Attach the legs to the table top using wood glue and screws. Use a level to ensure that the legs are aligned and the table top is stable.

    5. Finish the Table

    Once the table is assembled, you can finish it to your liking. Sand the surface to remove any rough edges and create a smooth finish. Then, apply stain, paint, or varnish according to the instructions for your chosen product.

    Tips for a Successful Build

    Here are some helpful tips for creating a stunning coffee table:

    • Plan Ahead: Create a detailed plan with dimensions and materials before you start cutting.
    • Measure Twice, Cut Once: Accuracy is key to achieving a professional finish.
    • Safety First: Always use safety glasses and ear protection when using power tools.
    • Take Your Time: Building a coffee table is a rewarding process. Enjoy the journey and let your creativity flow.

    By following this DIY guide, you can build a functional and stylish coffee table that will be a treasured addition to your home.

    Download the Free PDF

    To access a free PDF version of this guide, including detailed diagrams and tips for different table designs, please click here.

    Happy building!

    How to Make an Eco-Friendly Compost Bin at Home

    How to Make an Eco-Friendly Compost Bin at Home

    How to Make an Eco-Friendly Compost Bin at Home

    Composting is a fantastic way to reduce waste and create nutrient-rich soil for your garden. By diverting organic materials from landfills, composting helps to combat climate change and promote sustainable living. Building your own eco-friendly compost bin at home is a rewarding and simple project that can be accomplished with readily available materials.

    Benefits of Composting

    Composting offers a myriad of benefits for both the environment and your garden:

    • Reduces waste: By composting food scraps and yard waste, you divert these materials from landfills, reducing the amount of methane gas emitted into the atmosphere.
    • Enhances soil fertility: Compost enriches soil with essential nutrients, improving its structure, water retention, and aeration.
    • Promotes plant growth: Compost provides plants with a steady supply of nutrients, leading to healthier, more vibrant growth.
    • Conserves resources: By using compost, you reduce the need for chemical fertilizers, saving money and protecting water resources.
    • Reduces greenhouse gas emissions: Composting helps to sequester carbon, mitigating the effects of climate change.

    Choosing the Right Materials

    Compost bins can be made from a variety of materials, each with its own advantages and disadvantages. Here are some popular options:

    Wooden Bins

    Wooden bins are a classic choice for composters. They are readily available, relatively inexpensive, and can be easily customized to suit your needs. However, wooden bins require regular maintenance to prevent rot and decay. Consider using pressure-treated lumber or cedar for a longer lifespan.

    Plastic Bins

    Plastic bins are durable, weatherproof, and relatively low-maintenance. They are also readily available at garden centers and hardware stores. However, some may be concerned about the environmental impact of using plastic.

    Metal Bins

    Metal bins are highly durable and weatherproof. They are often used in larger composting systems, but smaller metal bins are also available. The downside is that metal can heat up quickly, potentially affecting the composting process.

    Tumbling Composters

    Tumbling composters are enclosed bins that rotate to mix and aerate the compost. They are a good option for smaller spaces and offer relatively quick composting times. However, they can be more expensive than other options.

    Building Your Compost Bin

    Once you have chosen your materials, it's time to build your compost bin. The following steps provide a general guide for constructing a basic wooden bin:

    Step 1: Gather Materials

    • Wood planks (2x4s or 2x6s)
    • Screws or nails
    • Power drill or hammer
    • Measuring tape
    • Level
    • Saw
    • Optional: Compost bin lid, hardware cloth for ventilation

    Step 2: Choose a Location

    Select a location that is sunny, well-drained, and accessible. The ideal location is close to your kitchen and garden to make it easy to add waste and access the finished compost.

    Step 3: Construct the Bin

    • Cut the wood planks to the desired dimensions for your compost bin. For a basic rectangular bin, you will need four long sides and two short sides.
    • Use screws or nails to assemble the four long sides into a square or rectangle.
    • Attach the short sides to the long sides, forming the bottom of the bin.
    • Optionally, add a lid to prevent rain and debris from entering the bin.
    • If using hardware cloth for ventilation, attach it to the sides of the bin, leaving gaps for airflow.

    Composting Basics

    Once your compost bin is ready, it's time to start adding your organic waste. Here are some fundamental principles of composting:

    Brown and Green Materials

    Composting relies on a balance of "brown" and "green" materials. Brown materials are carbon-rich, such as dry leaves, straw, and shredded paper. Green materials are nitrogen-rich, such as food scraps, grass clippings, and coffee grounds.

    Ratio of Brown and Green

    A general rule of thumb is to maintain a ratio of 2:1 brown to green materials. This helps ensure a healthy balance for the microorganisms that break down the organic matter.

    Moisture

    Compost needs to be moist, but not soggy. Ideally, it should feel like a wrung-out sponge. If it's too dry, add water. If it's too wet, add more brown materials.

    Aeration

    Compost needs oxygen to break down effectively. Turn the compost bin regularly to ensure good aeration. You can also add a layer of straw or shredded paper to the top to increase air circulation.

    Temperature

    Compost needs to be at a warm temperature for the microorganisms to thrive. An ideal temperature range is between 130 and 160 degrees Fahrenheit. If your compost isn't heating up, add more green materials.

    What to Compost

    Most organic materials can be composted. Here are some examples:

    • Food scraps: Vegetable peelings, fruit cores, coffee grounds, tea bags, eggshells
    • Yard waste: Grass clippings, leaves, twigs, shredded paper
    • Animal manure: Horse, cow, chicken, rabbit manure (avoid dog and cat manure as it may contain harmful pathogens)
    • Paper products: Cardboard, newspaper, paper towels, tissues (no glossy paper or paper with ink)
    • Wood ash: From fireplaces and wood stoves (small amounts only, too much can raise the pH of the compost)

    What Not to Compost

    Some materials should be avoided in your compost bin. These include:

    • Meat and bones: These materials attract pests and can take a long time to decompose.
    • Dairy products: Dairy products can create foul odors and attract pests.
    • Oil and grease: Oil and grease will not decompose and can make the compost oily and unusable.
    • Diseased plants: Composting diseased plants can spread pathogens to other plants.
    • Weeds with seeds: Composting weeds with seeds can introduce unwanted plants into your garden.

    Maintaining Your Compost Bin

    Maintaining your compost bin is essential for ensuring a successful composting process. Here are some tips:

    • Regularly add waste: Aim to add a layer of waste to your bin every few days.
    • Turn the compost: Turn the compost every week or two to aerate it and ensure even decomposition.
    • Monitor moisture levels: If the compost is too dry, add water. If it's too wet, add more brown materials.
    • Check for pests: Keep an eye out for pests such as rodents, insects, and slugs. If you notice any pests, remove them and consider using a pest-resistant compost bin.

    Harvesting Your Compost

    Compost is typically ready to use after about three to six months. Here's how to tell if your compost is ready:

    • Dark brown color: The compost should be dark brown and crumbly.
    • Earthy smell: It should smell earthy, not foul.
    • No recognizable materials: You should not be able to see any original materials in the compost.

    Once your compost is ready, you can use it to amend your garden soil, start new plants, or even sell it to others!

    Conclusion

    Building and maintaining a compost bin at home is a simple and rewarding way to reduce waste, improve soil health, and promote sustainable living. By following these tips, you can create a thriving composting system that will provide you with nutrient-rich compost for years to come.

    Woodworking magic box: diy build guide for beginners

    Woodworking magic box: diy build guide for beginners

    Crafting a Magical Wooden Box: A Beginner's Guide

    Want to create a whimsical and unique wooden box that doubles as a hidden compartment? Look no further! This guide will walk you through the steps of building your own "magic" box, perfect for storing treasures, secret messages, or even just adding a touch of enchantment to your home.

    Gather Your Magical Supplies

    Before you embark on your woodworking adventure, gather the necessary materials. You'll need:

    • Wood (pine or plywood works well)
    • Wood glue
    • Screws
    • Sandpaper (various grits)
    • Wood stain (optional)
    • Paint (optional)
    • Hinges
    • Magnetic catches (for the secret compartment)
    • Measuring tape
    • Pencil
    • Saw (hand saw or jigsaw)
    • Drill
    • Clamps
    • Safety glasses

    Step 1: Planning the Magic

    Start by designing your box. Sketch out the dimensions on paper, considering the size of the hidden compartment you desire. Determine the thickness of the wood and the overall shape of the box. Remember, you can get creative with the design â€" a traditional rectangular box, a whimsical chest, or even a unique geometric shape are all possibilities.

    The Hidden Compartment

    Think about where you want to place the hidden compartment. A false bottom is classic, but you can also incorporate a secret side panel or even a hidden drawer. This is your chance to let your imagination run wild.

    Step 2: Cutting and Shaping

    Now, using your saw and measuring tape, carefully cut the wood pieces according to your design. Remember to account for the thickness of the wood when calculating the sizes for the sides, top, and bottom.

    For the false bottom (or whichever part you're using for the secret compartment), cut two pieces â€" one for the visible bottom and one for the false bottom. The false bottom should be slightly smaller to create a space for storage.

    Step 3: Assembling the Box

    With your pieces cut, you can start building the box. Apply wood glue to the edges and carefully join the sides to the bottom, ensuring the corners are square and flush. Use clamps to secure the pieces while the glue dries.

    Once the glue is dry, attach the top to the box using wood glue and screws. Be sure to pre-drill holes for the screws to prevent the wood from splitting.

    Step 4: Creating the Secret

    Now it's time to build the hidden compartment. Attach the false bottom to the bottom of the box using wood glue and screws, ensuring it is flush with the sides.

    Step 5: Finishing Touches

    Sand the entire box with progressively finer grits of sandpaper to achieve a smooth finish. If desired, apply wood stain or paint to give your box a unique look.

    For the lid, attach hinges with screws. Next, install the magnetic catches on the lid and the box's hidden compartment, allowing it to close securely.

    Step 6: Revel in Your Magical Creation

    Congratulations! You have now created your very own magical wooden box, ready to hold your treasures or secrets. Enjoy the satisfaction of crafting this unique piece and the fun of revealing its hidden compartment to others.

    Wooden clock-building guide for craft lovers

    Wooden clock-building guide for craft lovers

    A Comprehensive Guide to Crafting a Wooden Clock

    Embark on a rewarding journey into the world of woodworking by constructing your very own wooden clock. This guide will lead you through every step, from selecting materials to finishing touches, empowering you to create a unique and functional timepiece that reflects your craftsmanship.

    Project Preparation: Laying the Foundation

    Choosing Your Wood

    The type of wood you choose significantly impacts the appearance and durability of your clock. Consider factors like:

    • Appearance: Hardwoods such as oak, cherry, walnut, and maple offer rich colors and beautiful grain patterns. Softwoods like pine and cedar provide a lighter, more rustic aesthetic.
    • Workability: Some woods are easier to work with than others. Hardwoods can be more challenging to cut and shape, but offer superior durability.
    • Cost: The price of wood varies widely, with exotic hardwoods being the most expensive.

    For a beginner, a readily available hardwood like oak or maple is a good starting point. It offers good workability and a striking visual appeal.

    Essential Tools and Materials

    To successfully complete this project, gather these necessary tools and materials:

    • Wood: Select your preferred wood in the dimensions required for your clock design. Consider using a combination of wood thicknesses for different components.
    • Clock Movement: Choose a clock movement mechanism that suits your design and desired features. Consider options like quartz movements for precise timekeeping or pendulum movements for a classic look.
    • Hand Set: Obtain a hand set that is compatible with your chosen clock movement. This includes the hour, minute, and potentially a second hand.
    • Saw: A handsaw, jigsaw, or circular saw will be necessary for cutting the wood to size.
    • Sandpaper: Assorted grits of sandpaper (from coarse to fine) are essential for smoothing surfaces and preparing them for finishing.
    • Wood Glue: A high-quality wood glue is needed for securely attaching the various parts of the clock.
    • Clamps: Clamps are essential for holding wood pieces together during gluing and other assembly steps.
    • Drill: A cordless drill with a variety of drill bits is helpful for creating holes for the clock movement and hands.
    • Wood Finishing Products: Select a wood finish that complements your chosen wood and desired aesthetic. Options include stain, paint, varnish, or oil.
    • Measuring Tape and Ruler: Precise measurement is crucial for accurate cutting and assembly.
    • Pencil: For marking wood and transferring patterns.
    • Safety Glasses: Always wear safety glasses while working with power tools.

    Design and Planning

    Before starting construction, meticulously plan your clock's design. This involves:

    Choosing a Clock Face Design

    Consider various options for the clock face:

    • Roman Numerals: A timeless and elegant choice.
    • Arabic Numerals: Modern and straightforward.
    • Custom Design: Express your creativity with unique shapes, symbols, or patterns.

    Remember to factor in the size of the clock face and the spacing of the numbers for optimal readability.

    Creating a Detailed Sketch

    Draw a detailed sketch of your clock, including all dimensions and components. This visual guide will ensure accuracy during construction.

    Selecting a Clock Movement

    The clock movement dictates the type of hands, power source, and overall functionality of your clock.

    • Quartz Movements: Highly accurate and typically battery-powered. They offer quiet operation and are readily available.
    • Pendulum Movements: Traditional and visually appealing, requiring winding and may not be as accurate as quartz movements.

    Choose a movement that aligns with your desired aesthetic and functional requirements.

    Construction: Bringing Your Design to Life

    Cutting the Wood Components

    Accurately cut the wood components according to your design sketch. Ensure clean cuts for a professional look.

    Assembling the Clock Case

    Carefully join the wood components of the clock case using wood glue and clamps. Consider using dowels, biscuits, or other joinery techniques for increased strength and stability.

    Creating the Clock Face

    Create the clock face by cutting out the desired shape and size. For numeral markings, use a router, hand-cut them, or simply apply pre-made decals.

    Installing the Clock Movement

    Prepare a recess in the back of the clock case to accommodate the clock movement. Ensure the movement is securely mounted.

    Attaching the Hands

    Insert the hands onto the clock movement according to the manufacturer's instructions.

    Finishing Touches: Adding Elegance and Durability

    Sanding

    Thoroughly sand all surfaces of the clock, starting with coarse grit sandpaper and gradually progressing to finer grits for a smooth finish.

    Applying the Finish

    Choose a wood finish that complements your chosen wood and desired aesthetic. Apply it evenly, following the manufacturer's instructions. Multiple coats may be required for a durable and beautiful finish.

    Adding Hardware

    Install any necessary hardware, such as hanging brackets, knobs, or embellishments, according to your design.

    Testing and Enjoyment

    Once the finish has dried, test the functionality of the clock mechanism. Adjust the time and enjoy your handcrafted wooden clock, a testament to your woodworking skills and creativity.

    Building a wooden clock is a rewarding project that combines artistry, craftsmanship, and the satisfaction of creating something beautiful and functional. By following this guide, you can embark on this fulfilling endeavor and create a timepiece that will be cherished for years to come.

    DIY Birdhouse Plans: How to Build It with Simple Instructions

    DIY Birdhouse Plans: How to Build It with Simple Instructions

    DIY Birdhouse Plans: Build a Feathered Friend's Haven

    Calling all bird enthusiasts and DIY aficionados! This comprehensive guide will walk you through building a charming birdhouse, providing a safe haven for our feathered friends. From selecting the right materials to assembling the house, we'll cover every step with detailed instructions and helpful tips. Let's get started!

    Choosing the Right Materials

    The first step is selecting the right materials. Opt for weather-resistant wood like cedar or redwood. These woods are naturally durable and resist rot, ensuring your birdhouse lasts for years. For a more affordable option, use pressure-treated pine, which is also designed for outdoor use. You'll also need:

    • Screws
    • Wood glue
    • Paint or stain (optional)
    • Roofing shingles or felt paper
    • Entry hole drill bit
    • Measuring tape
    • Saw
    • Drill
    • Sandpaper

    Planning the Design

    Before you start cutting wood, decide on the design of your birdhouse. Consider the type of birds you want to attract. For smaller birds like chickadees and wrens, create a smaller entry hole (around 1-1.5 inches in diameter). For larger birds like bluebirds, a 1.5-2 inch hole is more appropriate. Here's a basic design you can follow:

    Dimensions

    • Floor: 6 inches by 6 inches
    • Sides: 6 inches by 8 inches
    • Back: 6 inches by 8 inches
    • Roof: 8 inches by 8 inches

    Building the Birdhouse

    Now, let's assemble the birdhouse. Follow these instructions carefully:

    Step 1: Cut the Wood

    Cut the wood according to the dimensions listed above. Make sure the cuts are clean and precise for a professional finish. Use a saw or jigsaw for cutting the wood.

    Step 2: Assemble the Base

    Create the base of the birdhouse by attaching the two sides to the back panel. Use wood glue and screws for a strong bond. Make sure the sides are flush with the back panel.

    Step 3: Add the Floor

    Attach the floor to the base, ensuring it's centered. Secure it with screws and wood glue.

    Step 4: Create the Roof

    Cut two pieces of wood for the roof, each measuring 8 inches by 8 inches. Attach these pieces to the top of the birdhouse, forming an A-frame shape. Secure the roof using screws and wood glue.

    Step 5: Create the Entry Hole

    Drill a hole for the entry on one side of the birdhouse. The size of the hole will depend on the type of bird you want to attract. Carefully drill the hole using a drill bit with the correct diameter. Make sure the hole is smooth and free of splinters.

    Step 6: Finish the Birdhouse

    Sand the entire birdhouse to create a smooth surface and prevent splinters. Apply paint or stain if desired. For protection against the elements, consider using a weather-resistant sealant.

    Step 7: Add the Roof Covering

    To protect the birdhouse from rain, add a layer of roofing shingles or felt paper to the roof. Secure the shingles or felt paper with staples or screws.

    Installing the Birdhouse

    Choose a location that offers the birds protection from predators and the elements. Ideally, the birdhouse should be placed at least 5 feet off the ground and facing east or southeast. Mount the birdhouse using screws or wire. Ensure that the mounting method is secure to withstand wind and weather.

    Attracting Birds to Your Birdhouse

    Now that you have a beautiful birdhouse ready, it's time to attract some feathered residents. Here are some tips:

    • Place a bird feeder nearby.
    • Provide a water source.
    • Plant native trees and shrubs.
    • Avoid using pesticides or herbicides.

    Enjoy Your Feathered Friends

    With a little time and effort, you'll have a charming birdhouse that's sure to attract a variety of bird species. Sit back, relax, and enjoy the beauty and sounds of nature as you watch your feathered friends build nests and raise their young.

    Wooden clock diy: step-by-step for beginners

    Wooden clock diy: step-by-step for beginners

    Crafting a Wooden Clock: A Beginner's Guide

    Embark on a rewarding journey of woodworking by crafting your own wooden clock. This project, suitable for beginners, offers a blend of creativity and practicality, resulting in a unique timepiece to adorn your home. This comprehensive guide will lead you through each step, from selecting materials to installing the clock mechanism, ensuring a successful and satisfying experience.

    Step 1: Gather Your Materials and Tools

    Before you start, ensure you have the necessary materials and tools at hand. This will prevent interruptions and ensure a smooth workflow.

    Materials:

    • Wooden board (for the clock face): Choose a type of wood that is easy to work with, such as pine, plywood, or oak. The size of the board will depend on your desired clock size.
    • Clock movement kit: This kit typically includes the clock hands, a quartz movement, and a mounting nut.
    • Clock hands (optional): If you wish to customize the look of your clock, you can purchase separate clock hands to match your design.
    • Sandpaper (various grits): For smoothing and refining the wood surface.
    • Wood glue or wood screws: For securely attaching the clock movement and other components.
    • Stain or paint (optional): To add color and enhance the appearance of the clock face.
    • Clock numerals or markers (optional): For creating a clear time display.
    • Protective sealant (optional): To safeguard the wood against moisture and enhance its durability.

    Tools:

    • Measuring tape and ruler: To accurately measure and mark the wood.
    • Pencil or marker: To mark the wood for cutting and drilling.
    • Jigsaw or coping saw: For cutting the wooden board into your desired shape.
    • Drill and drill bits: To create holes for the clock movement and any other required parts.
    • Screwdriver: To fasten the clock movement and other components.
    • Sanding block: To smooth the edges and surface of the wood.
    • Clamps: To hold the wood securely during assembly.
    • Safety goggles and dust mask: To protect your eyes and lungs from dust and wood particles.

    Step 2: Designing and Cutting the Clock Face

    The design of your clock face is entirely up to your imagination. It can be a simple circle, a square, a unique shape, or even incorporate intricate carvings or inlays.

    Choosing the Shape:

    • Simple Circle: A classic and easy-to-cut shape.
    • Square or Rectangle: Offers a modern and minimalist look.
    • Geometric Shapes: Explore triangles, hexagons, or other geometric shapes for a unique aesthetic.
    • Freeform: Allow your creativity to flow and cut a whimsical or organic shape.

    Marking the Wood:

    • Use a pencil or marker to draw your desired shape onto the wooden board. Ensure the design is centered and to your liking.
    • If you're cutting a circle, use a compass or a template to accurately mark the circumference.

    Cutting the Shape:

    • Use a jigsaw or coping saw to carefully cut along the marked lines.
    • If you are using a jigsaw, work slowly and carefully to avoid splintering the wood.
    • If using a coping saw, make small, controlled cuts to ensure accuracy.

    Step 3: Sanding and Finishing the Clock Face

    Once your clock face is cut, it's time to refine its surface and prepare it for the next steps. Sanding ensures a smooth, even surface for applying paint or stain and enhances the overall appearance of the clock.

    Sanding:

    • Start with a coarse-grit sandpaper (around 80 grit) to remove any rough edges or imperfections.
    • Gradually progress to finer grits (120, 180, and 220 grit) to achieve a smooth finish.
    • Sand the entire surface of the clock face, including the edges, to ensure a consistent texture.

    Finishing (Optional):

    • Staining: Apply a wood stain to enhance the natural beauty of the wood and create a warm, rich color.
    • Painting: If you prefer a solid color, paint the clock face with a primer and then apply your chosen paint.
    • Protective Sealant: Apply a protective sealant, such as polyurethane, to protect the clock face from scratches, moisture, and spills.

    Step 4: Installing the Clock Movement

    The heart of your wooden clock is the clock movement, which provides the timekeeping mechanism. Ensure the movement is installed securely and accurately for a reliable timekeeping experience.

    Centering the Movement:

    • Use a pencil or marker to mark the center point of the clock face. This will be where you mount the clock movement.
    • Refer to the instructions that came with your clock movement kit for the recommended mounting hole diameter.
    • Drill a hole at the center point of the clock face using a drill bit that matches the required diameter.

    Mounting the Movement:

    • Align the clock movement over the hole you drilled.
    • Use wood glue or wood screws to securely attach the clock movement to the clock face. Ensure the hands align with the markings on the clock face.
    • If using wood screws, ensure you predrill the holes to prevent splitting the wood.

    Step 5: Adding Numerals or Markers

    To create a clear time display, you can add numerals or markers to your clock face. Choose a method that complements your overall design and aesthetic.

    Applying Numerals:

    • Pre-Made Numerals: You can purchase pre-made numerals made of wood, metal, or plastic. Use glue or wood screws to attach them to the clock face at the appropriate positions.
    • DIY Numerals: Create your own numerals by cutting them from wood or using stencils to paint them onto the clock face.

    Using Markers:

    • Stick-On Markers: These are pre-cut markers that you can easily apply to the clock face.
    • Painted Markers: Use a ruler and pencil to mark the positions for the hour markers and paint them on the clock face.

    Step 6: Installing the Clock Hands

    The final step is to attach the clock hands to the clock movement. Ensure the hands are securely fastened and properly aligned to ensure accurate timekeeping.

    Attaching the Hands:

    • Refer to the instructions provided with the clock movement kit to identify the hour hand, minute hand, and potentially a second hand.
    • Carefully align the hands with the corresponding mounting posts on the clock movement.
    • Use the small nuts provided with the kit to tighten the hands in place.

    Testing the Clock:

    • Once the hands are attached, insert a battery into the clock movement to activate it.
    • Observe the hands to ensure they move smoothly and accurately.
    • If needed, adjust the hands to the correct time using the setting knob on the clock movement.

    Finishing Touches and Displaying Your Clock

    Congratulations, you have successfully built your own wooden clock! To complete the project, consider adding some finishing touches and selecting a suitable place to display your masterpiece.

    Finishing Touches:

    • Clock Pendulum: Add a pendulum to your clock for a traditional touch.
    • Decorative Elements: Enhance the clock with embellishments such as wood carvings, painted details, or decorative hardware.
    • Personalized Touches: Add a personal touch by engraving your initials, a special date, or a meaningful quote onto the clock face.

    Displaying Your Clock:

    • Wall Mounting: Install a hook or bracket on the wall to securely hang your clock.
    • Stand: Create a custom stand for your clock from wood or metal.
    • Shelf Display: Place the clock on a shelf or mantle for a decorative display.

    Your wooden clock is now ready to be admired and enjoyed! This project not only resulted in a unique and functional timepiece but also provided an enriching woodworking experience. As you continue exploring the world of woodworking, remember to embrace the process, refine your skills, and let your creativity guide you. Enjoy the journey of building and sharing your handcrafted creations.

    How to build a customized wooden clock at home

    How to build a customized wooden clock at home

    Building a Customized Wooden Clock at Home: A Comprehensive Guide

    Creating a personalized wooden clock adds a unique and charming touch to any space. Whether you're a seasoned woodworker or a beginner eager to explore DIY projects, this comprehensive guide will equip you with the knowledge and steps necessary to build your very own custom timepiece.

    Materials and Tools

    Before embarking on this exciting project, gather the following essential materials and tools:

    Wood

    • Clock face: Choose a sturdy and aesthetically pleasing wood type. Popular options include plywood, oak, maple, or walnut. The thickness should be at least 3/4 inch for stability.
    • Clock hands: Seek out pre-made wooden clock hands that complement your chosen wood type and design. Consider the length and style, opting for hands that are proportionate to the clock face.
    • Clock mechanism: Select a quartz clock movement that includes hands, a clock face, and a mounting bracket. This ensures proper functioning and accurate timekeeping.

    Tools

    • Saw: A jigsaw or table saw for cutting the wood to shape.
    • Sandpaper: Various grits for smoothing the wood surface and removing imperfections.
    • Drill: With appropriate drill bits for creating pilot holes and securing the clock mechanism.
    • Screwdriver: For assembling components and attaching the clock hands.
    • Clamps: To hold pieces securely while cutting or sanding.
    • Measuring tape: For accurate dimensioning and marking.
    • Pencil: To mark the wood for cutting and drilling.
    • Wood glue: To bond the clock face pieces together if desired.
    • Finish: A clear sealant or stain, depending on the desired look.

    Design and Planning

    Before you start cutting, carefully design your wooden clock. Consider the following:

    Shape and Size

    Determine the desired shape of the clock face. Options range from traditional circles or squares to unique and unconventional designs. Choose a size that complements the intended location and aesthetic.

    Decorative Elements

    Consider adding decorative elements to personalize your clock. This could involve carving patterns, inlaying wood, adding embellishments, or using a unique finish.

    Mounting Method

    Decide how you will mount the clock. Options include attaching a stand, using a hanging mechanism, or incorporating a built-in easel.

    Construction

    Once your design is finalized, proceed with construction:

    Cutting the Clock Face

    Using a saw, carefully cut the wood to your desired shape and size. Ensure the edges are smooth and free of splinters.

    Sanding

    Sand the clock face thoroughly, starting with coarser grits and gradually progressing to finer ones. This will create a smooth surface for the finish.

    Assembling the Clock Face (if needed)

    If your design involves multiple pieces, use wood glue to bond them together. Clamp the pieces securely and allow the glue to dry completely.

    Mounting the Clock Mechanism

    Mark the center of the clock face where the clock mechanism will be mounted. Use a drill to create a pilot hole for the mounting bracket. Attach the bracket to the clock face using screws.

    Attaching the Clock Hands

    Insert the clock hands onto the clock mechanism's spindle, ensuring proper alignment. Secure them with the provided nuts.

    Finishing Touches

    Enhance the aesthetic appeal and durability of your wooden clock with these finishing touches:

    Applying Finish

    Apply a clear sealant or stain to the clock face, following the manufacturer's instructions. This will protect the wood and create a desired color or sheen.

    Mounting the Clock

    Attach the clock to its stand, hanging mechanism, or easel.

    Setting the Time

    Insert batteries into the clock mechanism and set the time using the crown or button on the movement.

    Tips and Techniques

    • Measure Twice, Cut Once: Double-check your measurements to ensure accurate cutting and avoid mistakes.
    • Use Clamps for Secure Assembly: Clamp pieces firmly together to prevent movement while gluing or drilling.
    • Pre-drill Holes for Wood Screws: Pre-drilling pilot holes reduces the risk of splitting the wood when screwing in components.
    • Sand Smoothly: Sanding with varying grits creates a smooth and polished surface.
    • Apply Finish Evenly: Apply finish in thin coats for an even application and to prevent runs or drips.
    • Consider a Protective Layer: If your clock will be exposed to moisture or dirt, apply a protective layer like polyurethane or varnish.

    Safety Precautions

    When working with wood and tools, prioritize safety:

    • Wear safety glasses to protect your eyes from flying debris.
    • Use ear protection when working with loud tools.
    • Keep fingers clear of moving saw blades and drill bits.
    • Work in a well-ventilated area to avoid inhaling dust and fumes.

    Conclusion

    Building a customized wooden clock at home is a rewarding project that combines creativity, craftsmanship, and practical skills. By following this comprehensive guide, you can create a unique and personalized timepiece that adds a touch of charm and elegance to any space. Remember to prioritize safety, take your time, and enjoy the process of crafting a timeless creation.

    Detailed Squirrel Box Plans for Beginner Woodworkers

    Detailed Squirrel Box Plans for Beginner Woodworkers

    Building a Squirrel Box: A Beginner Woodworker's Guide

    Hey there, fellow woodworkers! Ever wanted to help out your local squirrel population while also getting some hands-on experience with woodworking? Well, you're in luck because today we're diving into the world of squirrel box construction. This guide is perfect for beginners who are just starting out with woodworking. It's designed to be simple and straightforward, with easy-to-follow instructions and plenty of helpful tips along the way.

    Building a squirrel box is a fun and rewarding project. Not only will you be providing a safe and cozy home for these adorable critters, but you'll also be learning valuable woodworking skills. So grab your tools, gather your materials, and let's get started!

    Choosing the Right Wood

    The type of wood you use for your squirrel box is important. It needs to be durable enough to withstand the elements and the occasional squirrel antics. Here are some popular options:

    • Cedar: Known for its natural resistance to rot and insects, making it ideal for outdoor projects.
    • Redwood: Similar to cedar, redwood offers excellent durability and a beautiful reddish-brown color.
    • Pressure-treated lumber: Provides a long lifespan, but it's important to note that pressure-treated wood can contain chemicals that may be harmful to animals.
    • Pine: While not as durable as cedar or redwood, pine is readily available and affordable.

    When choosing your wood, be sure to inspect it for any cracks, knots, or other defects. You want to ensure your squirrel box is sturdy and safe for its future residents.

    Gathering Your Tools and Materials

    Here's a list of the tools and materials you'll need for this project:

    • Wood: 1x6 or 1x8 boards (approximately 12 linear feet total)
    • Circular saw or handsaw: For cutting the wood to size
    • Measuring tape: For accurate measurements
    • Pencil: For marking your cuts
    • Drill: For creating pilot holes
    • Screwdriver or drill bit: For attaching the wood pieces
    • Wood screws: 1 1/2 inch long (at least 20)
    • Hammer: For securing nails (optional)
    • Safety glasses: Protect your eyes while working with power tools
    • Work gloves: For safe handling of wood and tools
    • Sandpaper: For smoothing out rough edges (optional)
    • Wood sealant or paint (optional): For added protection and aesthetics

    Building the Squirrel Box

    Now that you have your tools and materials ready, it's time to build your squirrel box. Follow these steps:

    Step 1: Cut the Wood

    Start by cutting your wood to size. You'll need the following pieces:

    • Base: 1 piece 12 inches long x 6 inches wide
    • Sides (2): 1 piece 12 inches long x 6 inches wide
    • Back: 1 piece 12 inches long x 6 inches wide
    • Front: 1 piece 12 inches long x 6 inches wide
    • Roof (2): 2 pieces 12 inches long x 6 inches wide

    Remember to make your cuts with precision. Use a measuring tape and a pencil to mark your lines before cutting. You can use a circular saw or a handsaw to make the cuts. If using a handsaw, be sure to have a sawhorse to support the wood for a stable cut.

    Step 2: Assemble the Base and Sides

    Now, assemble the base and sides of your squirrel box. Lay the base down flat and then attach the two sides to the base using wood screws. Screw the sides into the base from the inside, making sure they're flush with the edge of the base. You can use a drill to pre-drill pilot holes to prevent splitting the wood.

    Step 3: Attach the Back and Front

    Next, attach the back and front pieces. Position the back panel against the sides and screw it into place using wood screws. Then, attach the front panel in the same manner. Remember to pre-drill pilot holes for these screws as well.

    Step 4: Create the Roof

    For the roof, you'll be creating two identical pieces that will overlap and form a slight slant. Position the two roof pieces at a slight angle, creating a small overhang at the back to provide additional shelter from the elements. Use wood screws to attach the roof pieces to the back panel and then to the sides. Remember to pre-drill pilot holes.

    Step 5: Create the Entry Hole

    Now it's time to create the entry hole. Choose a spot on the front panel where you want the entry hole. Using a drill bit that's slightly smaller than the diameter you desire, carefully drill a hole in the center of the desired entry hole location. Then, use a jigsaw or a coping saw to cut out the entry hole, taking your time for a clean cut. You can also create a "landing platform" by cutting a small rectangular piece of wood and attaching it just below the entry hole to help squirrels gain access.

    Step 6: Finishing Touches

    To complete your squirrel box, you can add some finishing touches. Sand any rough edges to create a smooth surface. You can also apply a wood sealant or paint to protect the wood and enhance its appearance. If you're using paint, be sure to choose a non-toxic option that's safe for animals. When applying any kind of finish, be sure to let it dry completely before placing the box in its final location.

    Tips for Choosing the Perfect Location

    Finding the right location for your squirrel box is essential. It should be placed in an area that offers a good balance of safety, visibility, and food sources.

    • Height: Mount the box at least 6 feet above the ground. This will help deter predators and ensure a safe haven for the squirrels.
    • Protection: Locate the box in a sheltered spot, like beneath a tree or overhang. This will provide protection from rain and harsh sunlight.
    • Food sources: Choose a location near a food source, such as trees with nuts or berries. It's also helpful to place a feeder nearby for additional food.
    • Visibility: Ensure the box is easily visible from a distance. This will make it easier for you to monitor the box and ensure it's being utilized. Also, make sure the area is safe for people and animals to access.
    • Secure mounting: Use heavy-duty screws or brackets to securely attach the box to a tree or post.

    Maintenance and Care

    Once your squirrel box is in place, it's important to check on it regularly and maintain it to keep it in good condition. Here are some tips:

    • Inspect regularly: Check the box every few months for signs of wear and tear, such as cracks, holes, or damaged wood. Repair or replace any damaged parts as needed.
    • Clean the box: Remove any debris or nesting materials. Squirrels can be pretty messy, and cleaning the box will help to keep it sanitary and comfortable for its residents.
    • Replenish bedding: Place fresh bedding inside the box, like shredded paper or dry leaves. This will provide a soft and comfortable place for the squirrels to rest.
    • Check for pests: Be on the lookout for signs of pests, such as insects or rodents. If you find any, remove them and consider treating the box with an appropriate pest control solution.

    Enjoy Your Squirrel Box

    Congratulations! You've successfully built your very own squirrel box. Now you can enjoy watching these adorable creatures come and go, and know that you've provided them with a safe and cozy home. Remember to keep an eye on the box and make sure it's being used. You may even be lucky enough to spot baby squirrels in the box, which is always a heartwarming sight!

    Building a squirrel box is a great way to connect with nature, learn valuable woodworking skills, and make a positive impact on your local wildlife. It's a fun and rewarding project that anyone can do, regardless of their experience level. So, go ahead, give it a try and see for yourself!